Tuesday, December 20, 2011

Tip Tuesday: Make your Own ringtone for your Iphone!!

Okay, so I finally wore DH down and convinced him to let me get an iphone!! SOO excited. I already had an ipod touch for a couple years and absolutely loved it, but I just wished it was my phone also. Well, in recent years, DH has become a stickler about purchasing ringtones. He thinks it's a "rip" to pay the money for them and then you have to repurchase the tones if you get a new phone. SO, I thought I'd attempt to see if I could create my own. I mean, it IS an ipod after all, so you'd think you could create a ringtone with your own music somehow. WELL, YES YOU CAN! Sorry if I'm shouting...I'm a bit excited..ha...

So, what I did was go to THIS SITE and followed the directions. However, I ran into a couple glitches and had to read ALL the comments until I figured it out. Hope this helps!

1. First, open Itunes.

2. Locate the song you wish to create a ringtone with and play it. Write down the start and stop times of the section you wish to use. Be careful to stay under 30 seconds. (I did Bruno Mars Lazy Song at start 0:49.5 Stop 1:11.8)

3. Right click on the song and click Get Info

4. Go to the Options tab and click on the Start box and enter the start time you noted. Do the same with the Stop box. Click OK

5. Right click on the song again and Click Create AAC version

6. After it's created right click on the short version and click Show in Windows Explorer

7. Now you need to Rename the file to a shortened name and change the .m4a extension to say .m4r. Here's where I had a hangup. I couldn't change the extension. If you can’t change the ext. Go to Control Panel, Appearance and Personalization, Click Folder Options,Click the View tab, , uncheck “Hide extension…”. Click OK.

8. Drag file to desktop.

9. Delete the file from the playlist. (If it asks, keep file, do not move to trash.)

10.  Double-click the file which will now open in iTunes. Check your Tones folder, the file should be there.

11. Now plug your iphone into your computer. When your phone is recognized. Click on it in the left sidebar so that you can see all of it's info. At the top, you should see a few different tabs. Click on the Tones tab. Make sure Sync Tones is checked and then All tones should be marked.

12. Sync your phone and it should show up in your ringtones.

It says you can't create tones with songs downloaded from itune but can only use those ripped from a cd. Not true. I was able to following these directions :)
This ROCKS! Hope it helps you!


Thursday, December 8, 2011

Here's to 'Birthdays'!


Okay, so I've been pretty lucky blessed. I haven't personally lost anyone to cancer. Thank You, Lord! I have thankfully, however had a couple aunts on both my side and husband's side who have BEAT the disease. Praise the Lord! So why should I care about this then? Well, I'll tell ya. It's because of the faces in this picture. These 4 are my life, they are everything to me (besides my Heavenly Father).
This life is so precious and every little moment we have counts.  I want many more birthdays for myself and for these special people in my life. If you're a mom or dad, then you know the feeling you get when you look at your kids. It's a complete awe that sweeps over me trying to comprehend that they were given to me and are a part of me. There's a saying I heard before, that having children is knowing what it's like to have your heart walking around outside of your body. This is so true. My heart aches for these girls...to watch them grow, to be there for their first everythings...first day of school, first boyfriend, first time driving a car, first break-up, first date, first kiss...(well, I won't literally be with them for some of these;) though if I could, I'd somehow tag along...lol ) I want to be a part of every important moment of their lives or at least be there when they get home. Do you know that commercial where the dad is giving his daughter the keys to his car and he sees her as a little girl when she's really an adult? Those commercials get to me every time. I look at my girls and can see life passing me in a blink. I often try and savor these moments and take a mental snap-shot before it's gone. I pray that my family and I have many many more birthdays and never have to be a part of the American Cancer Society in that way. BUT I am thankful there is such an organization in existence should it ever be needed. Happy Birthday to all those out there who have made it another year because of the American Cancer Society!

"This post is sponsored by American Cancer Society."

Wednesday, December 7, 2011

Veggie Pizza


Okay, so this recipe is another of my favorites. It's so simple and delicious and you feel like you're eating healthy with all the raw veggies. Perfect appetizer for parties!

Ingredients:

1 8oz package cream cheese, softened
1 package ranch dressing mix
1/2 green pepper, chopped small
1-2 carrots, peeled and chopped small
1 cup mushrooms chopped small
1 head of broccoli, chopped small
2 packages refrigerated crescent rolls


Preheat oven to 350 degrees Fahrenheit (or according to crescent roll package) Lay out the two packages of crescent rolls into a rectangle on a baking sheet or stone. Using a rolling pin, press the seams together to make a large rectangular pizza.

Bake according to package directions until golden. Let cool.

Meanwhile, in a small bowl, mix together softened cream cheese (you can microwave the cream cheese if it is not soft enough. It needs to be spreadable) and ranch dressing mix.


Prep veggies and chop finely. I usually use a Pampered Chef chopper for this. But a large knife will do just fine.

Spread the cream cheese mixture to cover entire crust. Next pour chopped veggies to cover crust. Press the veggies down into the cream cheese mixture to make it act like a glue.
Cut into 1-2 inch squares. Chill until ready to serve.


Tuesday, December 6, 2011

Tip Tuesday: Surefire Cure for Hiccups!


Okay, so the other day I was trying to think of something that would be a good tip to share. Something that has been useful for me to know that others would possibly appreciate and I remembered how to cure hiccups! Okay okay, I can't take ALL the credit....actually, one of my best friends shared this tip with me a couple years ago and honestly, it has NEVER failed.
SOOO...do you wanna know? It's so simple and may sound a little ridiculous but trust me. It works!

Here's what you do:
Take a glass and fill it with water.
Now, drink from the opposite side of the glass.

That's it. Really.

I know what you're thinking..."Yeah right, like that's gonna work." I'm right there with ya. When my friend  told me, I thought it was a joke too...because he is always finding some way to tease me like I'm his little sister. SO I was waiting for the "catch". But really, there is none :) I promise, every single time I have used this it has worked! I even shared the tip with a friend of mine and she said it worked for her too. Sooo...if you try it and it works PLEASE let me know. If it doesn't then share that too. Love to hear from ya!

Wednesday, November 30, 2011

Sweet Potato Casserole


Okay, so here's a recipe that is a Thanksgiving staple in my home. It's a MUST-MAKE no matter what for my DH. He loves this recipe. Most sweet potato casseroles have a marshmallow topping and while I do like those, I really love this brown sugary crust much better.

Ingredients
4 1/2 cups mashed sweet potatoes
1/2 cup butter softened
1/3 cup milk
1 cup white sugar
1/2 teaspoon vanilla
2eggs, beaten
1 cup brown sugar
1/2 cup flour
1/3 cup butter
1 cup chopped pecans (optional....I don't ever put them in. I did once and it was delicious but DH didn't like it)

Preheat oven to 350 degrees Fahrenheit. So first thing is first peel your sweet potatoes. I used these two huge sweet potatoes and they were plenty. If you see my cutting board it's about 15 inches wide and the one was almost that long. Then cut the potatoes up small. The smaller they are the quicker they'll cook. Don't boil the water first. Rinse the potatoes and put them in the pot. Fill with water till just covered. Add salt and cover with a lid. This will help to quicken the boiling process. Cook over med-high heat. When the water begins to boil, take off the lid so that it doesn't overflow. The water is pretty starchy so just like with pastas, water will boil over if a lid is on the pot.

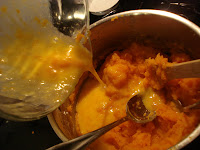
Next drain the potatoes and put back in the hot pot. This will help dry them out so that there is not too much excess moisture. Mash potatoes but don't over mash unless you like it to be pretty smooth. I like my sweet potatoes to have lumps (but not my mashed potatoes). Add the milk, butter, sugar and vanilla. Stir gently.

Next we want to temper the eggs. Since the potatoes are hot, if we add eggs now then we'll have scrambled eggs mixed in our potatoes. Gross. SO first put your eggs in a bowl and beat with a fork or whisk. Next add a tablespoon of the sweet potato mixture and mix. Do this a couple more times to bring the temperature of the eggs up slowly. Now add the eggs to the sweet potatoes. Mix together gently.

Place in a casserole dish.
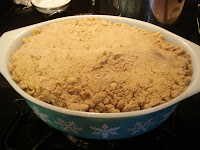
In a small mixing bowl mix the flour and brown sugar. Cut in the butter using a pastry blender or two knives until resembling coarse crumbs.

Pour brown sugar evenly over the potatoes. Bake in a preheated oven for 30-40 minutes until the brown sugar forms a crust.


 Hope you enjoy this as much as my family does!


Tuesday, November 29, 2011

Tips Tuesday: Reading to Your Kids


Okay, so it's time for your tip of the week! Aren't you excited? Well, a friend shared this article with me and I thought I'd pass it along. It's from the New York Times and talks about how reading to your kids can improve their scores in school. DH and I try to do this already . However, sometimes life is so hectic and can be hard to find a minute to just sit down period let alone sit down and read a book. When it was just Princess8 in the house we had all the time in the world (or now it seems), but now with 3 princesses in the house it's a juggling act to get to each of them equally. We don't read every night, but try at least a couple times a week. Actually, I am able to read chapter books with my Princess8 which I LOVE since I myself am a bit of a bookworm. We read Nancy Drew and the Clue Crew series and now are reading The Indian in the Cupboard. Princess5 loves anything pink and girly so she is on a Pinkalicious/Purplicious kick. She also loves Princess Sparkle and Fancy Nancy. Princess2 loves Elmo and Blues Clues but really, she loves anything we make interesting. So, maybe this will give you a little motivation to read to your kids. We aren't perfect by any means but I am glad to know that this really helps.

Read How About Better Parents by Thomas L. Friedman

Monday, November 28, 2011

Chicken and Dumplins


Okay, so when I think of "Comfort Foods" this is the meal that comes to my mind every time. I remember growing up in North Carolina and we'd  have Sunday Supper at my bff's (Amy) house. Her mom made some pretty awesome Chicken n dumplins among many others (though I was never a fan of lima beans...sorry Miss Terry)  It took me quite some time to come up with a recipe that I loved. This meal takes a couple hours and some lovin but it's so worth the effort! Enjoy! How do YOU make your chicken n dumplins?


Ingredients:
1 3-6 lb. frying chicken
2 quarts water
2 tsp salt
1/2 tsp thyme
1/2 tsp. rosemary
3 stalks celery, cut into thirds
3 cloves garlic
1 large onion
2 large carrots peeled and quartered
For Dumplins:
2 cups flour
1/2 tsp. baking soda
1/2 tsp salt
2 T. bacon drippings (hardened) plus 1T. shortening (OR 3 T. shortening)
3/4 cup buttermilk
1/2 tsp. chicken bouillon or poultry seasoning


First remove the giblets and the neck from the chicken. Unwrap and place in the stock pot. I usually cook these along with the chicken because it adds flavor to the stock. Next rinse the chicken inside and out.


Place chicken in a dutch oven or large stockpot.  Add onion, garlic, bay leaf, celery, carrots, salt, pepper,  rosemary, thyme and water. Bring to a boil.

Cover, reduce heat and simmer for 1-2 hours or until tender. (Chicken should almost fall off the bone.)


Remove chicken from the broth and cool. Remove giblets and neck. Discard.


Strain out onions, celery, garlic and bay leaf, leaving only broth.  Remove the skin from the chicken.


De bone the chicken. Cut into bite-sized pieces or just use your hands to break it apart.

Skim fat off the top and then bring broth to a boil. Then add a little bit of flour water to act as a thickener.

I usually add a heaping teaspoon full of flour to a cup (you can use one of those cups for mixing protein shakes if you prefer...I actually forgot I to use it when I made this, but I use it often) Add a little water, not a whole lot. Maybe 1/4 cup. Us a fork to mix together and use your fingers to break up an lumps

You want it to be thick and runny with no lumps. Add it to the broth at this point. Just a tablespoon or so of the liquid. Stir.


Meanwhile, mix together the flour, baking soda, salt, and chicken bouillon (or poultry seasoning). I only add a little. It's not supposed to overpower the dumplins, just add flavor. The jar on the right is my jar of bacon drippings. I save them for use with this meal and soups, cornbread, anything really....it just adds another layer of flavor.

Using a pastry cutter or two knives, cut in the bacon dripping and shortening until incorporated and looking like coarse crumbs.


Add buttermilk and mix together.


Knead dough 4 or 5 times.


You can pinch off pieces like this and drop them in....


OR do what I do now, and roll the dough out to 1/4 inch thickness. Sprinkle with salt and pepper and gently pat it down so the salt and pepper stick. Cut in 1 to 1 1/2 inch squares. It doesn't have to be perfect.  I used to make the drop dumplins but now you can see I have been rolling them out. I like the squares better. They're not as thick and seem to cook a little better.


Don't these look tasty?


Reduce heat to med-low and cook 10 minutes. You want the dumplins to begin to set so that when you put the chicken back in they don't break apart.


 Using a wooden spoon, gently stir in the chicken. Simmer on low for 20 minutes.
Serve it up on a cold day and everyone will love it!


Related Posts Plugin for WordPress, Blogger...